Gboard Voice Typing
Gboard support voice typing for not only in English but for many local languages. The accuracy and speed of Gboard's ability to covert your text into word in many languages can speed up your android typing tremendously. Gboard uses online database for voice typing and you need to be connected with your mobile data for using it. However for specific languages especially English languages for many countries, Gboard has offline language packs which can be downloaded and stored in your mobile for voice typing. Here is a step-by-step guide to configure and use voice typing in Gboard.
How to configure voice typing
Before start using voice typing you need to activate voice key to make it available in the keyboard layout. You can start using the voice typing with this minimum settings, however advance settings can help you manage languages & offline speech recognition packs for offline voice typing.
Activate Voice Key to use voice typing
- Open Gboard Settings
- Tap Preferences under settings menu
- Tap Voice input key link located in Keys heading under Preferences
- On tapping voice input key, the microphone icon is placed in keyboard layout top right corner.
Add languages for voice typing
- Open Gboard Settings
- Tap Voice typing under settings menu
- Tap Languages to add or delete languages you would use for voice typing. Search button is not available for quick selection, you need to scroll to select the languages from the huge list. By default English language for the respective country is enabled, you can add more languages from this menu. All languages enabled for voice typing is displayed with tick mark in blue square button.
- Tap on Block offensive words under Voice settings to enable Gboard to not to suggest offensive words.
Manage Offline speech recognition packages
- Open Gboard Settings
- Tap Voice typing under settings menu
- Tap on Offline speech recognition to manage offline package downloads.
- On tapping Download Language screen will open which shows Language packs available for downloading, installed language packs and Auto-update settings to manage pack downloading automatically.
- Under All heading you can view list of language packs available for downloading. Tap on language you want to install and tap DOWNLOAD or CANCEL link from the pop-up screen. If DOWNLOAD link is tapped the pack starts getting downloaded and will be displayed under Installed heading once the download is successfully completed. Depends the size of the pack it may take some time to download.
- Under Installed heading all the installed packs with their downloaded size displayed. Tap on any language to uninstall the downloaded packs. You can not uninstall all packs as at least one language pack need to be available always.
- Under Auto-update heading you can manage the automation of pack downloads. You can choose to disable automated downloads or configure the auto-update downloading source either from mobile data connection or Wi-Fi as the files size is bigger which may result in consumption of data bandwidth.
How to use voice typing
- Open keyboard through any app like Gmail or WhatsApp
- Tap Globe key to choose native typing mode of any language like QWERTY from Change Keyboard screen.
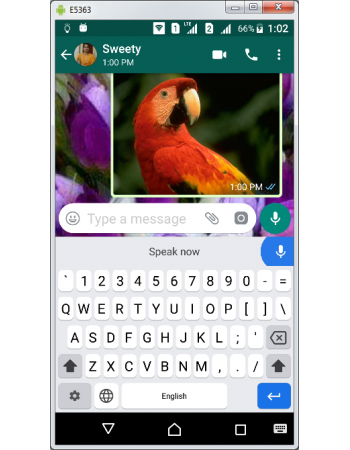
- Tap on the microphone icon located in top right corner of the layout.
- On tapping, the mic icon become filled with background color similar to enter key background based on your theme settings.
- Voice typing starts getting initialized and you could see Speak now text is displayed on left side of the mic.
- If you can not see Speak now text after tapping mic icon, you need to enable your data connection or download offline speech recognition pack for the language you are using for voice typing.
- On getting Speak now text, start dictating the words.
- Once you start dictating, Listening text appears and what ever you speak gets being available in typing box.
- If no audible input is received for more than 5 seconds since speak now text was displayed, Gboard will stop accepting voice typing.
- However if at least one word gets accepted then the 5 seconds time frame is not applicable.
- To Stop voice typing tap on microphone icon again resulting in disappearance of "Listening now" text from the strip bar.

